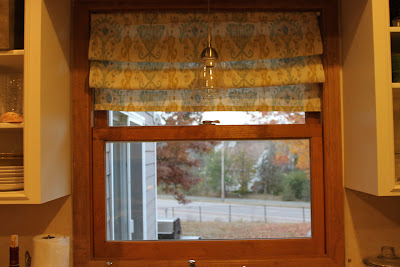
I have been trying to get my kitchen put back together the way I would like it since giving my cabinets a face lift. One thing I have been putting off is window treatments for the one small window. I have never had them for this window but since painting the cabinets white, I wanted to add just a hint of color! I searched hi and low for some pre-made ones but nothing that I liked. And then I saw this on
Tatertots & Jello...
I thought to myself, I could totally do that!!!
But then saw the stencil price tag and decided
I'm too cheap. But towards the end of her post, she mentioned this website,
Imparting Grace. So I clicked away and LOVED what I saw!
And so easy to do! You can easily follow her steps or check out my pictures below. I already had the fabric, I want to make some throw pillows from it. I have plenty so I measured my window and went to work!
1. Cut your fabric to fit your window, giving yourself about an inch extra on each side. I purchased the tension rods from Target, Heat and Bond from Joanns.
2. Place heat and bond about an inch below fabric. I first ironed about a one inch hem. The directions on the back of the Heat and Bond are very easy to follow, this was my first time using it.
3. & 4. Iron fabric down, gently folding a small piece in to create a nice clean edge.
Sorry, this picture sucks...
5. For the top edge, I wanted to have a space to slide the tension rod in. So I made a hem about 2 inches (sorry, I was working upside down on my ironing board, this is the top part of the shade).
6. I measured about an inch from where I ironed to figure out where I wanted the Heat & Bond to go. Then I carefully ironed that seam, making sure I had at least an inch opening for my tension rod.
Once all the seams were cooled, I hung my shade using 1 tension rod.
I then placed another tension rod about 4 inches below the top one. And then the last tension rod about 4 inches below that one. I then "roman-ized" my shade to my liking, adjusting the distance between the tension rods until I liked what I saw (sorry, forgot to take a picture of that part).
Voila! Easy Faux Roman Shade!! In less than an hour!
And here's one with my lovely vintage light on!


