Friday, November 11, 2011

Easy Faux Roman Shades

I have been trying to get my kitchen put back together the way I would like it since giving my cabinets a face lift.   One thing I have been putting off is window treatments for the one small window.  I have never had them for this window but since painting the cabinets white, I wanted to add just a hint of color!  I searched hi and low for some pre-made ones but nothing that I liked.  And then I saw this on Tatertots & Jello...


I thought to myself, I could totally do that!!!

But then saw the stencil price tag and decided I'm too cheap. But towards the end of her post, she mentioned this website, Imparting Grace.  So I clicked away and LOVED what I saw!


And so easy to do!  You can easily follow her steps or check out my pictures below.  I already had the fabric, I want to make some throw pillows from it.  I have plenty so I measured my window and went to work!

1.  Cut your fabric to fit your window, giving yourself about an inch extra on each side.  I purchased the tension rods from Target, Heat and Bond from Joanns.

2.  Place heat and bond about an inch below fabric. I first ironed about a one inch hem.  The directions on the back of the Heat and Bond are very easy to follow, this was my first time using it.

3. & 4.  Iron fabric down, gently folding a small piece in to create a nice clean edge. Sorry, this picture sucks...


5.  For the top edge, I wanted to have a space to slide the tension rod in.  So I made a hem about 2 inches (sorry, I was working upside down on my ironing board, this is the top part of the shade).

6.  I measured about an inch from where I ironed to figure out where I wanted the Heat & Bond to go.  Then I carefully ironed that seam, making sure I had at least an inch opening for my tension rod.

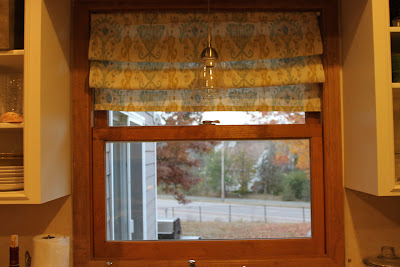
 Once all the seams were cooled, I hung my shade using 1 tension rod. 


I then placed another tension rod about 4 inches below the top one.  And then the last tension rod about 4 inches below that one.  I then "roman-ized" my shade to my liking, adjusting the distance between the tension rods until I liked what I saw (sorry, forgot to take a picture of that part). 

Voila!  Easy Faux Roman Shade!! In less than an hour!


And here's one with my lovely vintage light on!


Monday, November 7, 2011

Changes are happening!

Yea for fall!  And yea for crossing a few items off my long to-do list!


  • paint A's big girl room
  • organize kid's closet
  • organize pantry
  • paint mudroom/build lockers
  • add some bling and accessories to piano room
  • finish organizing master closet
  • paint vanity in kid's/guest bathroom
  • convince husband master bedroom needs a face lift
  • purge toys in playroom and organize
  • figure out what to put over the couch...the wall has been sitting empty for 9 months already.
  • office/craft room needs help. lots of it. might have to save that for 2012!


  • So I guess I really haven't done as much as I would like but that's a start!  I painted Ava's room but need to finish it, the ribbon stencil was a complete fail (I love how idea pamphlets seem so much easier than they really are!).

    Hopefully I can get a few more things done before Thanksgiving!  And then lots more as we enter 2012!!